Webpack 自定义 Loader 和 Plugin
一. 自定义Loader
创建自己的Loader
Loader是用于对模块的源代码进行转换(处理),我们项目中使用过很多Loader,比如css-loader、style-loader、babel-loader等。
这里我们来学习如何自定义自己的Loader:
- Loader本质上是一个导出为函数的JavaScript模块;
- loader-runner库会调用这个函数,然后将上一个Loader产生的结果或者资源文件传入进去;
编写一个 Loader 模块这个函数会接收三个参数:
- content:资源文件的内容;
- map:sourcemap相关的数据;
- meta:一些元数据;
jsmodule.exports = function(content, map, meta) { return content; }
Loader的执行顺序
- Loader的执行顺序是从后往前,从右往左的
module: {
  rules: [
    {
      test: /\.jsx?/,
      use: [
        'loader01',
        'loader02',
        'loader03'
      ]
    }
  ]
}
resolveLoader属性
Loader的查找路径是可以自己配置的
- 配置resolveLoader属性;
jsresolveLoader: { modules: ['node_modules', './custom_loaders'] }resolveLoader的查找规则:
- 默认是 node_modules
- 如果配置了,会先去配置的路径下查找
- 如果找不到,再去 node_modules 下查找
- 如果找不到,会报错
NormalLoader和PitchLoader
我们正常导出为函数的JavaScript模块是
NormalLoader事实上还有另一种Loader,称之为
PitchLoader:jsmodule.exports.pitch = function() { console.log('pitch loader'); }我们一般不会在PitchLoader中做任何事情的,PitchLoader是用来扫描有多少个Loader需要执行的
执行顺序和enforce
其实这也是为什么loader的执行顺序是相反的:
- run-loader先优先执行PitchLoader,在执行PitchLoader时进行loaderIndex++;
- run-loader之后会执行NormalLoader,在执行NormalLoader时进行loaderIndex--;
- 也就是说,当有三个Loader和pitch的时候,执行顺序是:Pitch01、Pitch02、Pitch03、Loader03、Loader02、Loader01
那么,能不能改变它们的执行顺序呢?
- 我们可以拆分成多个Rule对象,通过enforce来改变它们的顺序;
enforce一共有四种方式:
- 默认所有的loader都是normal;
- 在行内设置的loader是inline(import 'loader1!loader2!./test.js');
- 例如在需要指定加载的loader可以在文件开头加上:
import 'loader01!./math.js'
- 例如在需要指定加载的loader可以在文件开头加上:
- 也可以通过enforce设置 pre 和 post;
在Pitching和Normal它们的执行顺序分别是:
- post, inline, normal, pre;
- pre, normal, inline, post;
enforce 属性用于指定 loader 的执行顺序,它只允许设置以下三个值:
- "pre" - 表示这个 loader 会在所有普通 loader 之前执行
- "post" - 表示这个 loader 会在所有普通 loader 之后执行
- 不设置 enforce 属性 - 表示这是一个普通 loader,按照配置的顺序执行
jsmodule: { rules: [ { test: /\.jsx?/, use: 'loader01', enforce: 'pre' }, { test: /\.jsx?/, use: 'loader02' }, { test: /\.jsx?/, use: 'loader03', enforce: 'post' } ] }
同步的Loader
什么是同步的Loader呢?
- 默认创建的Loader就是同步的Loader;
- 这个Loader必须通过 return 或者 this.callback 来返回结果,交给下一个loader来处理;
- 通常在有错误的情况下,我们会使用 this.callback;
this.callback的用法如下:
- 第一个参数必须是 Error 或者 null;
- 第二个参数是一个 string 或者 Buffer;
js// 同步loader module.exports = function(content) { console.log('loader01'); return content } module.exports = function(content) { console.log('loader02'); this.callback(null, content) }
异步的Loader
什么是异步的Loader呢?
- 有时候我们使用Loader时会进行一些异步的操作;
- 我们希望在异步操作完成后,再返回这个Loader处理的结果;
- 这个时候我们就要使用异步的Loader了;
loader-runner已经在执行Loader时给我们提供了方法,让Loader变成一个异步的Loader:
- 使用
this.async的回调
jsmodule.exports = function(content) { const callback = this.async(); // 使用定时器来模拟异步处理 setTimeout(() => { callback(null, content); }, 3000) }- 使用
this.async 一旦被调用,此时 return 的返回值将被忽略
传入和获取参数
在使用Loader时,传入参数。
jsmodule: { rules: [ { test: /\.jsx?/, use: [ { loader: 'loader01', options: { name: 'khx', age: 18 } } ] } ] }然后我们在自己的Loader中使用
this.getOptions()就能获取到传进来的options参数
参数校验
我们可以通过一个webpack官方提供的校验库 schema-utils,安装对应的库:
npm install schema-utils -D可以编写对应的schema.json,使用从 schema-utils 中导入的
validate函数来校验。- 以下面的自定义babel_loader为例进行说明。
babel_loader案例
目录结构如下:
├── babel.config.js
├── custom_loaders
|  ├── babel_loader.js
|  └── schema
|     └── babel_loader_schema.json
├── node_modules
|  ├── @babel
|  ├── @types
├── package.json
├── pnpm-lock.yaml
├── src
|  └── main.js
└── webpack.config.js
我们知道babel-loader可以帮助我们对JavaScript的代码进行转换,这里我们定义一个自己的babel-loader(babel_loader):
jsconst babel = require('@babel/core'); const { validate } = require('schema-utils'); const schema = require('./schema/babel_loader_schema.json'); module.exports = function(content) { // 使用异步loader const callback = this.async(); // 获取options let options = this.getOptions(); if (Object.keys(options).length === 0) { options = require('../babel.config'); } // 验证options validate(schema, options, { name: 'custom_babel_loader', baseDataPath: 'options', }); // 使用babel转换代码 babel.transform(content, options, (err, res) => { err ? callback(err) : callback(null, res.code); }) }webpack.config.js
jsconst path = require('path'); module.exports = { mode: 'production', entry: './src/main.js', output: { path: path.resolve(__dirname, './build'), filename: 'bundle.js' }, resolveLoader: { modules: ['node_modules', './custom_loaders'] }, module: { rules: [ { test: /\.jsx?/, use: { loader: 'babel_loader', options: { plugins: [ "@babel/plugin-transform-arrow-functions" ], presets: [ "@babel/preset-env" ] } } } ] } }babel_loader_schema.json
json{ "type": "object", "properties": { "presets": { "type": "array", "items": { "type": "string" } }, "plugins": { "type": "array", "items": { "type": "string" } } }, "additionalProperties": false }main.js
jsconst message = 'Hello World'; const fn = () => { console.log(message); } fn();使用webpack构建之后,我们能看到根目录下多了一个 build 目录
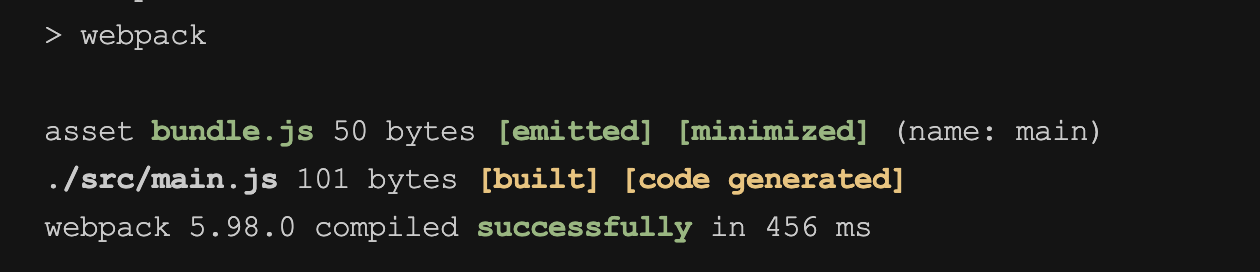
由于我这里使用的是生产环境的打包,所以代码被压缩的比较简化,可以看到下面的打包结果

二. 自定义Plugin
Webpack和Tapable
- 我们知道webpack有两个非常重要的类:Compiler和Compilation
- 他们通过注入插件的方式,来监听webpack的所有生命周期;
- 插件的注入离不开各种各样的Hook,而他们的Hook是如何得到的呢?
- 其实是创建了Tapable库中的各种Hook的实例;
- 我们想要学习自定义插件,最好先了解一个库:Tapable
- Tapable是官方编写和维护的一个库;
- Tapable是管理着需要的Hook,这些Hook可以被应用到我们的插件中;
Tapable有哪些Hook呢

Tapable的Hook的类型
基础钩子类型
Basic Hook:
这种钩子会依次执行所有被注册的函数,没有任何特殊的逻辑处理。Waterfall Hook:
类似于基础钩子,但它会将前一个函数的返回值作为参数传递给下一个函数,形成“瀑布流”式的数据传递。Bail Hook:
当某个被注册的函数返回非undefined的值时,钩子会立即停止执行后续的函数,类似于“保险丝”机制。Loop Hook:
当某个被注册的函数返回非undefined的值时,钩子会从第一个函数重新开始执行,直到所有函数都返回undefined为止。
同步与异步钩子
- Sync Hook:
只能注册同步函数,使用myHook.tap()方法进行注册。 - AsyncSeries Hook:
可以注册同步、基于回调(callback)和基于 Promise 的函数,分别使用myHook.tap()、myHook.tapAsync()和myHook.tapPromise()进行注册。这些函数会按顺序依次执行。 - AsyncParallel Hook:
同样可以注册同步、基于回调和基于 Promise 的函数,但所有异步函数会并行执行,而不是按顺序执行。
- Sync Hook:
Tapable的Hook
| Hook 类型 | 特点 | 使用场景 |
|---|---|---|
| SyncHook | 依次执行所有同步函数 | 简单的同步函数链式调用 |
| SyncWaterfallHook | 将前一个同步函数的返回值传递给下一个函数 | 需要传递数据的同步场景 |
| SyncBailHook | 遇到非 undefined 返回值时停止执行 |
需要提前退出的同步场景 |
| SyncLoopHook | 遇到非 undefined 返回值时重新从第一个函数开始执行 |
需要循环执行的同步场景 |
| AsyncSeriesHook | 按顺序执行异步函数,前一个函数完成后才会执行下一个 | 需要按顺序执行异步任务的场景 |
| AsyncParallelHook | 并行执行异步函数,所有函数同时开始执行 | 需要并行执行异步任务的场景 |
| AsyncSeriesWaterfallHook | 按顺序执行异步函数,并将前一个函数的返回值传递给下一个函数 | 需要按顺序执行异步任务并传递数据 |
| AsyncSeriesBailHook | 按顺序执行异步函数,遇到非 undefined 返回值时停止执行 |
需要按顺序执行异步任务并提前退出 |
| AsyncParallelBailHook | 并行执行异步函数,遇到非 undefined 返回值时停止执行 |
需要并行执行异步任务并提前退出 |
Webpack 中常用钩子
| 钩子名称 | 触发时机 | 典型用途 |
|---|---|---|
compile |
在编译开始之前触发 | 初始化操作,例如记录编译开始时间 |
compilation |
在创建新的 compilation 对象时触发 |
在编译过程中对模块进行处理 |
make |
在开始构建模块时触发 | 自定义模块构建逻辑 |
afterCompile |
在模块编译完成后触发 | 分析编译结果,执行后续操作 |
optimize |
在优化阶段开始时触发 | 自定义优化逻辑 |
optimizeChunks |
在优化 chunks 时触发 | 对 chunks 进行自定义优化 |
emit |
在生成资源并输出到目录之前触发 | 修改或添加资源文件 |
afterEmit |
在资源已经输出到目录之后触发 | 记录日志、清理临时文件等后续操作 |
done |
在构建完成后触发 | 通知用户构建完成,执行收尾工作 |
自定义Plugin
我们在自己的项目中经常能看到非常多的Plugin:
- CleanWebpackPlugin
- HTMLWebpackPlugin
- MiniCSSExtractPlugin
- CompressionPlugin
- 等等。。。
这些Plugin是如何被注册到webpack的生命周期中的呢?
- 第一:在webpack函数的
createCompiler方法中,注册了所有的插件; - 第二:在注册插件时,会调用插件函数或者插件对象的
apply方法; - 第三:插件方法会接收
compiler对象,我们可以通过compiler对象来注册Hook的事件; - 第四:某些插件也会传入一个compilation的对象,我们也可以监听compilation的Hook事件;
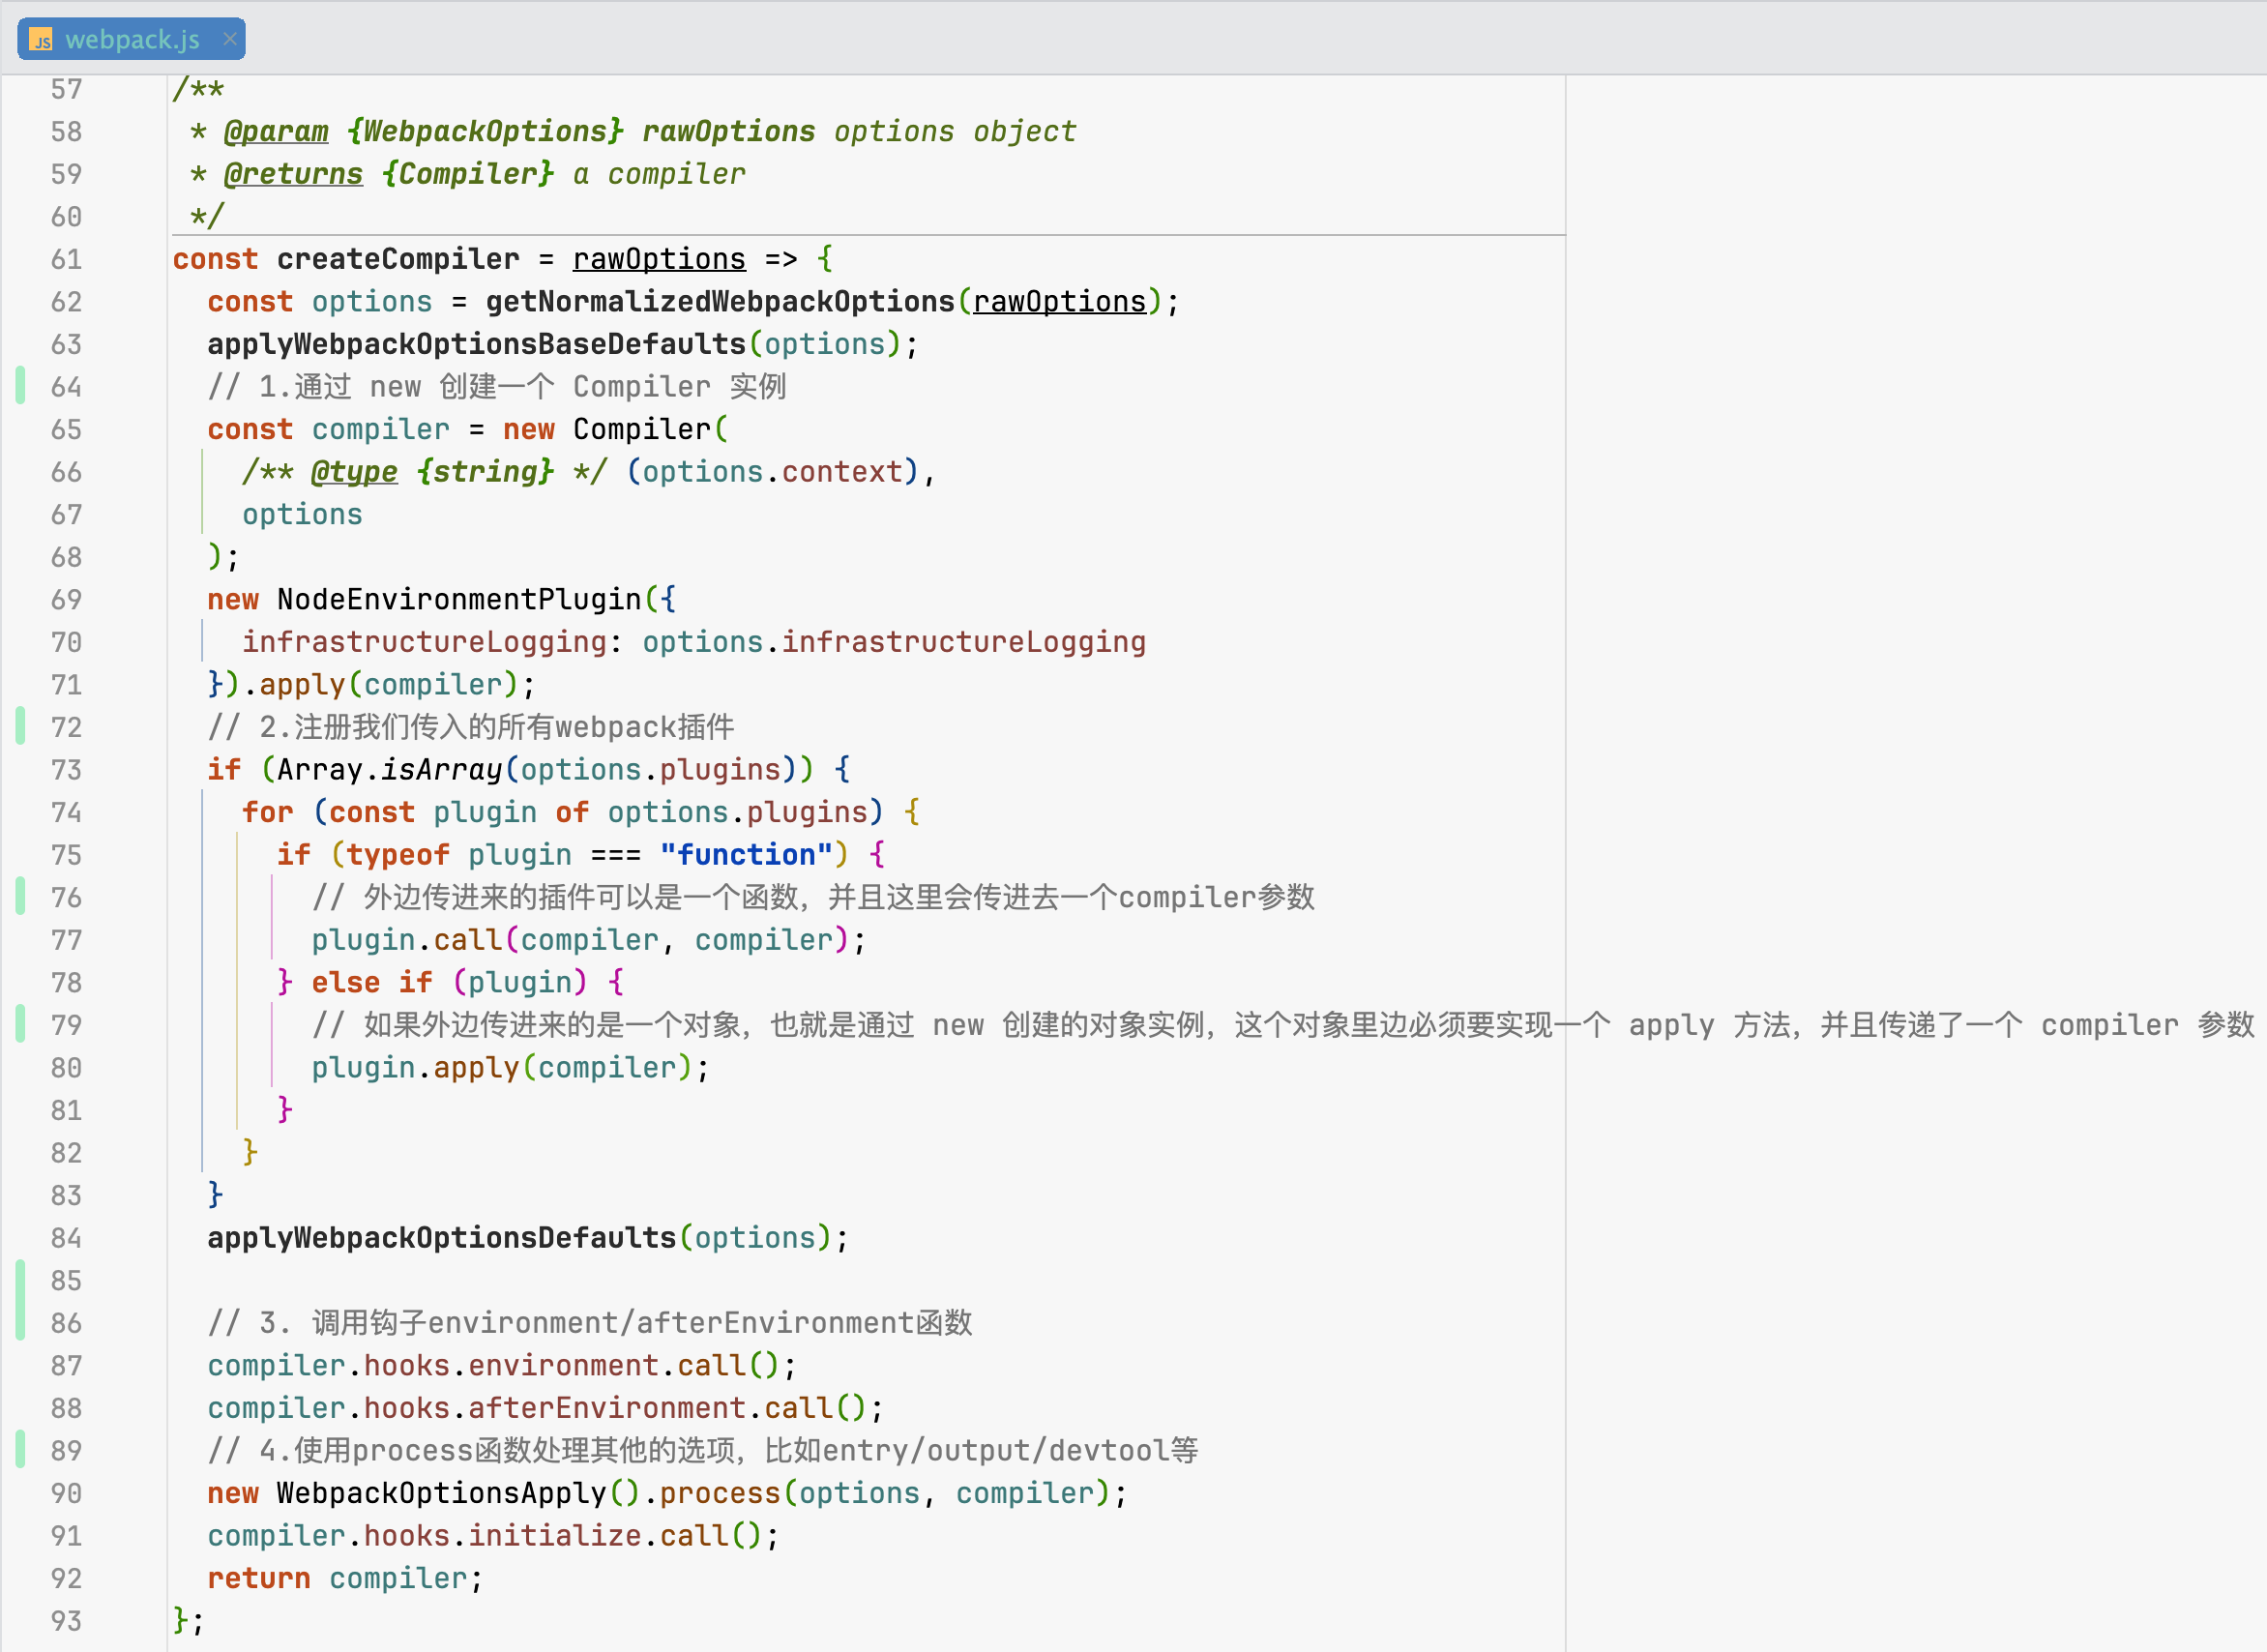
- 第一:在webpack函数的
编写自己的插件
作用:记录每次 Webpack 构建过程中的关键信息
项目目录结构
├── babel.config.js
├── custom_loaders
|  ├── babel_loader.js
|  └── schema
|     └── babel_loader_schema.json
├── custom_plugins
|  └── build_info_plugin.js
├── node_modules
|  ├── @babel
|  ├── @types
├── package.json
├── pnpm-lock.yaml
├── src
|  └── main.js
└── webpack.config.js
webpack.config.js
jsconst path = require('path'); const BuildInfoPlugin = require('./custom_plugins/build_info_plugin'); module.exports = { mode: 'production', entry: './src/main.js', output: { path: path.resolve(__dirname, './build'), filename: 'bundle.js' }, resolveLoader: { modules: ['node_modules', './custom_loaders'] }, module: { rules: [ { test: /\.jsx?/, use: { loader: 'babel_loader' } } ] }, plugins: [ new BuildInfoPlugin({ filename: 'build-info.json' }), ] }build_info_plugin.js
jsconst fs = require('fs'); const path = require('path'); class BuildInfoPlugin { constructor(options) { this.options = options || { filename: 'build-info.json' }; } apply(compiler) { // 在 Webpack 的 "afterEmit" 钩子中执行逻辑 compiler.hooks.afterEmit.tapAsync('BuildInfoPlugin', (compilation, callback) => { // 创建一个包含构建信息的对象 const buildInfo = { timestamp: new Date().toISOString(), hash: compilation.hash, assets: Object.keys(compilation.assets), warnings: compilation.warnings.length, errors: compilation.errors.length, }; // 定义 JSON 文件的路径 const filePath = path.resolve(compiler.outputPath, this.options.filename); // 读取现有的 JSON 文件(如果存在) let existingData = []; if (fs.existsSync(filePath)) { try { const fileContent = fs.readFileSync(filePath, 'utf8'); existingData = JSON.parse(fileContent); } catch (err) { console.error('Failed to read or parse existing build-info file:', err); } } // 将新的构建信息追加到数组中 existingData.push(buildInfo); // 将更新后的内容写回文件 fs.writeFileSync(filePath, JSON.stringify(existingData, null, 2), 'utf8'); // 调用回调函数,通知 Webpack 继续执行 callback(); }); } } module.exports = BuildInfoPlugin;第一次构建(build-info.json):
json[ { "timestamp": "2025-03-14T04:21:04.862Z", "hash": "66ed8997f5252b59ad38", "assets": [ "bundle.js" ], "warnings": 0, "errors": 0 } ]当我修改了main.js文件之后再次构建:
json[ { "timestamp": "2025-03-14T04:21:04.862Z", "hash": "66ed8997f5252b59ad38", "assets": [ "bundle.js" ], "warnings": 0, "errors": 0 }, { "timestamp": "2025-03-14T04:24:11.926Z", "hash": "94626f0db4f6a2199de2", "assets": [ "bundle.js" ], "warnings": 0, "errors": 0 } ]

 Hersan
热爱编程,开源社区活跃参与者